Learning Docker [Part 1]
tldr;
DOCKER IS CRAY. Check out the basic skeleton for a dockerized flask app here
Docker
What is Docker? What is an image? What are containers?
Aims
- [ ] Set up a flask website
- [ ] Run Flask Docker Image in a container
- [ ] Integrate Redis
- [ ] Docker Compose
- [ ] Integrate Gunicorn Application Server
- [ ] Integrate Nginx Webserver
*disclaimer: running in Mac because I tried to install Docker in my Windows and it was already a heck of a neck pain.
Set up
Install them here
Create new project directory
|-.gitignore
|-app.py
|-requirements.txt
|-venv/
Virtual Environment
I'm choosing to use a python virtual environment. So run virtualenv venv inside the project directory. Tada! I like to use venv because it keeps my global environment clean. Use source venv/bin/activate to activate it.
Install Flask
Run pip install Flask. To your app.py, add:
from flask import Flask
app = Flask(__name__)

@app.route('/')
def hello_world():
  return "Hello World"

if __name__ == "__main__":
  app.run(host='0.0.0.0',debug=True)
Run python app.py to start the Flask development server. Navigate to the your localhost:5000 and you should see 'Hello World'!
Build Docker Image
Create a Dockerfile and add to it:
FROM python:3.4
RUN mkdir -p /usr/src/app
WORKDIR /usr/src/app

COPY requirements.txt /usr/src/app/
RUN pip install --no-cache-dir -r requirements.txt

COPY . /usr/src/app
CMD [ "python", "./app.py" ]
Imagine you created a digital ocean droplet and the Dockerfile contains a set of instructions that will be run in that droplet (in this case, a container). It is quite self-explanatory - FROM is the base image (taken from docker hub), RUN is the command to execute etc. My first thought was that it was like a bash script.
Run docker build -t flask-hello . (note the full stop) -t gives the image a tag - a friendly name.
$ docker image ls

REPOSITORY            TAG            IMAGE ID
flask-hello           latest         add769d07b0c
Yay - image is built! Now we have to run this image in a container.
Run in container
docker run -d -p 5000:5000 flask-hello
- -d: runs in the background
- -p: port in container exposed to port in localhost
- --rm: remove container after done automatically
This moment was the real magic for me - the container running your image is exposed to your local machine through the ports! It is prove that your image somehow works. I still don't really get it but its magical.
docker ps to see what containers are currently up. It works the same as docker containers ls. The -a tag shows all containers even if its not actively running.
Redis and Docker Compose
In requirements.txt, add redis
In app.py,
from flask import Flask
from redis import Redis

app = Flask(__name__)
redis = Redis(host='redis', port=6379)

@app.route('/')
def hello_world():
  redis.incr('hits')
  return 'Flask Dockerized. Viewed {} time(s)'.format(redis.get('hits'))

if __name__ == "__main__":
  app.run(host='0.0.0.0',debug=True)
Edit your file structure
|-.gitignore
|-web/
|--app.py
|--requirements.txt
|--Dockerfile
Create a new file docker-compose.yml at the root.
version: '2'
services:
  web:
    image: flask-hello
    restart: always
    build: ./web
    ports:
    - "5000:5000"
    volumes:
    - .:/code
    depends_on:
    - redis
    command: python app.py
  redis:
    image: redis
Run docker-compose build.
Make sure you stop the container running on port 5000:
docker ps
docker stop <id / name>
docker-compose up
If you go to your localhost:5000 you should see the Flask Dockerized page and when you refresh, the #times should increase. Yay redis is working!
Time for Gunicorn
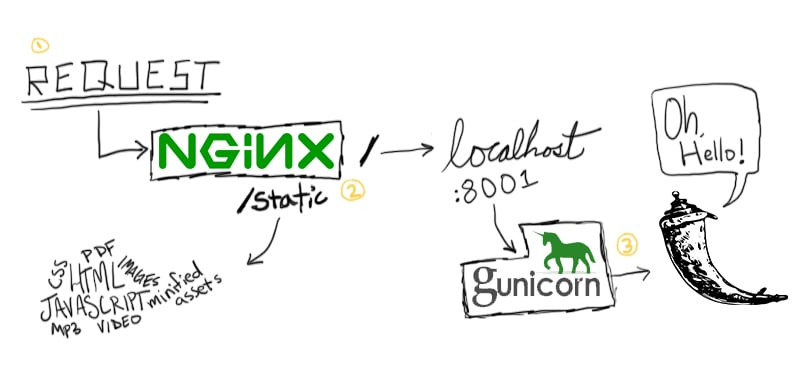
Gunicorn is an application server. Flask's built in Werkzeug server is not production-safe as it handles one request at one go, hence we use an application server like Gunicorn on top of Flask and then a web server and reverse proxy like Nginx on top of it all.
There are 4 files to alter.
-
Remove the
app.run()command fromapp.py. -
Create a new
wsgi.pyfile.
# wsgi.py
from app import app

if __name__ == "__main__":
app.run(host='0.0.0.0')- Add
gunicornto the list of requirements. - In
docker-compose.yml, changecommand: gunicorn -b :5000 wsgi:app
Run docker-compose build (you should see them installing gunicorn as the requirements are copiedo ver) and then docker-compose up.
You may have to docker-compose kill to kill the previous processes. Navigate to localhost:5000 and you should see your flask dockerized there! Yay.
Time for Nginx
As you can think of nginx being a web server service, we can abstract it into its own container and have the two different containers communicating to each other then.
At the root folder, create a new folder called nginx.
|-web/
|-nginx/
|--Dockerfile
|--flask_site.conf
|--nginx.conf
-
nginx.confA standard set of configuration. -
flask.conf- Configuration specific to our app. The web:5000 is the name of our container and the port which it is exposed at.
server {
  listen 80;
  location / {
    proxy_pass http://web:5000;
    proxy_set_header Host $host;
    proxy_set_header X-Real-IP $remote_addr;
    proxy_set_header X-Forwarded-For $proxy_add_x_forwarded_for;
  }
}
- in
Dockerfile
FROM nginx:1.13.3

RUN rm /etc/nginx/nginx.conf
COPY nginx.conf /etc/nginx/

RUN rm /etc/nginx/conf.d/default.conf
COPY flask_site.conf /etc/nginx/conf.d/
So what this does is to pull the nginx iamge from docker hub if it does not already exist locally. With the nginx config in that container, replace it with our own nginx config file and flask config file.
- Add a new service under
docker-compose.yml
nginx:
  image: flask-nginx
  restart: always
  build: ./nginx
  ports:
  - "80:80"
  depends_on:
  - web
Test if our containers are running!
$ docker-compose ps
$ docker-compose stop
$ docker-compose kill
$ docker-compose build
$ docker-compose up
It runs a tad bit slow. But it works! Maybe there will be more information letting on.
Part One Done!

In Part One, we learnt how to create docker images by specifying a Dockerfile. We learn how to create and destroy a container using that image.
Then we added more services like nginx and redis. To be able to control multiple services (images), we used docker-compose.yml to orchestrate the running and communication between containers.
Yay! In the next part, we will try to deploy our containers into a digital ocean droplet.
Thanks for sticking till the end :)
Did you know this was built with 11ty and tailwind? And works even with Javascript disabled? Yeah I don't care either.